
WordPress
How To Accept PayPal Payments On My Website
Feb
How to Accept PayPal Payments On My Website: A Comprehensive Guide
Accepting PayPal payments on your website is not just a convenience—it’s a necessity. With over 400 million active users, PayPal has become a trusted name in secure and fast online payments. If you’re a freelancer, small business owner, or e-commerce retailer, enabling PayPal on your website can boost credibility, streamline transactions, and increase conversions.
This guide will walk you through how to accept PayPal payments on your website, covering setup steps, tools, and best practices. Stick around until the end, where we introduce QuickPay Link, a game-changing tool designed to simplify PayPal payments while offering features that elevate your sales strategy.
Why Accept PayPal Payments on Your Website?
Before diving into the “how,” let’s address the “why.” Accepting PayPal payments comes with several benefits:
1. Global Accessibility
PayPal operates in over 200 markets, making it an ideal solution for businesses with international customers.
2. Trusted Payment System
Buyers often abandon purchases due to security concerns. PayPal’s reputation as a secure platform builds trust with your audience.
3. Easy Integration with Popular Platforms
Whether you use WordPress, Shopify, or Wix, PayPal offers simple integration options tailored for non-technical users.
4. Faster Transactions
With PayPal, transactions are processed quickly, reducing the time customers spend at checkout—a key factor in lowering cart abandonment rates.
How to Accept PayPal Payments on Your Website

Adding PayPal to your website is easier than ever, thanks to a variety of integration methods. Below, we outline step-by-step instructions to help you get started.
Step 1: Set Up a PayPal Business Account
To accept payments on your website, you’ll need a PayPal Business account. Here’s how to create one:
- Visit PayPal.com and click Sign Up.
- Choose “Business Account” and provide your business information, including your email address, business name, and phone number.
- Verify your account by linking a bank account or credit card.
This business account will serve as the foundation for processing transactions through your website.
Step 2: Choose the Right PayPal Integration Method
PayPal offers several integration options based on your website’s needs and your technical expertise:
1. PayPal Checkout
PayPal Checkout is a button that allows customers to pay using their PayPal account or credit/debit card. It’s ideal for businesses seeking simplicity.
- How to Add PayPal Checkout to Your Website:
- Log in to your PayPal Business account.
- Navigate to App Center > PayPal Checkout.
- Follow the on-screen instructions to generate the code snippet.
- Paste this code into your website’s HTML where you want the button to appear.
2. PayPal Payment Buttons
These customizable buttons let customers make purchases, donations, or subscriptions.
- Steps to Add Payment Buttons:
- Go to your PayPal dashboard and select Tools > PayPal Buttons.
- Choose the type of button you need (e.g., Buy Now, Donate, Subscribe).
- Configure the button’s appearance and payment details.
- Generate the HTML code and embed it on your website.
3. PayPal API Integration
For developers, PayPal APIs provide advanced customization options. This method requires programming knowledge but offers seamless integration for unique use cases.
4. Third-Party Plugins
Platforms like WordPress and Shopify have plugins that make it easy to integrate PayPal without touching code.
Step 3: Optimize the Checkout Experience
Once PayPal is integrated, focus on creating a frictionless checkout process to maximize conversions. Consider the following:
- Use Express Checkout: This allows customers to pay without creating an account, reducing barriers to purchase.
- Mobile-Friendly Design: Ensure your checkout page is optimized for mobile devices.
- Display Trust Badges: Include the PayPal logo to reassure customers that their transactions are secure.
Advanced Features for Accepting PayPal Payments

Taking your payment setup to the next level involves utilizing advanced PayPal features and tools. Here’s what you should explore:
1. Subscriptions and Recurring Payments
If you offer subscription services, enable recurring payments to automate billing. PayPal’s subscription management tools let you track payments, issue refunds, and manage customer subscriptions.
2. Invoicing
Freelancers and service providers can send professional invoices directly from their PayPal account. This feature simplifies billing and enables clients to pay with a single click.
3. Multi-Currency Support
Appeal to international customers by allowing payments in their local currency. PayPal automatically handles currency conversion, simplifying global transactions.
Common Challenges and How to Overcome Them
While PayPal integration is straightforward, you may encounter a few challenges. Here’s how to address them:
1. High Transaction Fees
PayPal’s fees can add up, especially for small businesses. To offset this cost:
- Encourage larger transactions.
- Pass fees onto customers (if allowed by your jurisdiction).
2. Limited Customization
Some PayPal buttons and features offer limited branding options. To solve this, use third-party tools like QuickPay Link for more flexibility.
3. PayPal Account Freezing
Prevent account issues by adhering to PayPal’s policies, avoiding suspicious transactions, and promptly resolving disputes.
Introducing QuickPay Link: Elevate Your PayPal Payment Strategy
Accepting PayPal payments becomes even more seamless with QuickPay Link—a powerful software designed to simplify and enhance your payment process. Perfect for freelancers, small businesses, and online retailers, QuickPay Link offers cutting-edge features that maximize convenience for you and your customers.
Key Features of QuickPay Link
1. Create PayLinks from Your WordPress Admin
Generate unique PayLinks directly within your WordPress dashboard, saving time and minimizing technical hassles.
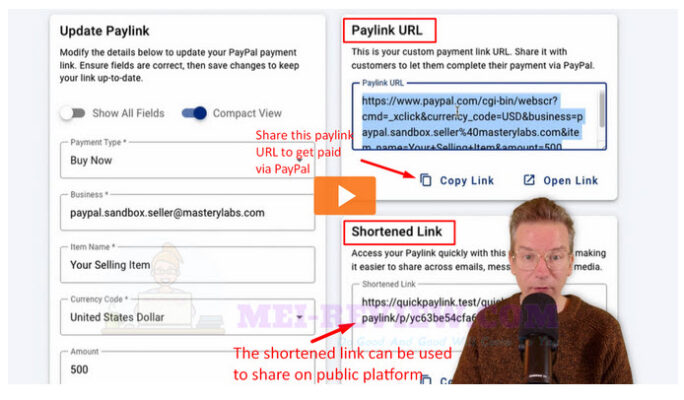
2. Direct PayLink URL for PayPal Payments
Share direct payment links via email, social media, or SMS, allowing customers to complete transactions effortlessly.
3. Shortened Links for Easy Sharing
QuickPay Link automatically shortens URLs, making them easier to share across platforms.
4. Flexible Payment Options
Offer customers various payment options, including one-time payments, subscriptions, and donations—all managed through PayPal.
Why Choose QuickPay Link?
Here’s why QuickPay Link stands out as the ideal solution for accepting PayPal payments:
- User-Friendly Interface: No coding knowledge required.
- Boosts Conversion Rates: Simplified payment options reduce cart abandonment.
- Customizable Links: Tailor payment links to suit your branding.
- Affordable Pricing: A cost-effective solution for small businesses.
How to Get Started with QuickPay Link
Getting started with QuickPay Link is quick and easy. Follow these steps:
- Visit our store to purchase QuickPay Link.
- Install the software on your WordPress site or preferred platform.
- Start creating and sharing PayLinks with your customers.
Conclusion: Simplify Payments, Grow Your Business
Learning how to accept PayPal payments on your website is a critical step toward increasing sales and building trust with your audience. By integrating PayPal and optimizing your checkout process, you’ll deliver a seamless experience for your customers.
For those looking to take it a step further, QuickPay Link offers advanced features that make accepting payments faster, easier, and more flexible.
Don’t wait to enhance your payment system. Visit our link below today to purchase QuickPay Link and start experiencing the benefits of seamless PayPal transactions.
Click Here To Purchase QuickPay Link Today!
How to Accept PayPal Payments On My Website